Saturday, 10 September 2011

It's bottling time!


Hermano has left the confines of my brewing tub and is now safely contained within forty-two 500ml bottles. I'd been checking the Specific Gravity (SG) every day and we had been at 1.009 since Thursday night. I could have bottled the beer last night but I wanted to double check the SG again today and it also gave me the time to finalise my beer label. I'll spare you the maths, but Hermano should come in at around 3.9% ABV. I had originally planned a picture label but decided against it for several reasons. I then thought I'd mimic the Corona label however this led to a interesting issue. The Corona-style label is oval, and as I would be printing and cutting around forty-five labels I realised that creating anything but rectangular labels would be simply stupid. The label above is the final printed version. The bottling itself was simply enough. The supplied plastic bottles are already sterilised so I simply needed to to fill, prime, cap and label.

Filling
The kit comes with a handy valve for bottling. It connects to the tap which you turn on about ¼. The beer fills it however it has a pressure valve at the bottom, a bit like a stop valve on a garden hose. With nothing pressing against it, the valve is sealed shut by the gravity pressure of the beer. When the valve comes into contact with the bottom of the bottle, it is pushed up and allows beer to flow. This means the bottles fill steadily with minimal foaming. Filling itself was easy however my first 4-5 were a little under filled as I had failed to account for the volume of the bottling valve itself and I was stopping too far from the top of the bottle.

Priming & Capping
Priming can be a tricky process however the kit comes to the rescue again, supplying Carbonation Drops that look a little like boiled sweets. They contain a pre-measured sugar dose that gives my Cerveza its fizz and ferments it for the second time. The capping process is simply a case of screwing the self-sealing plastic bottle cap on tightly. My wife Jenny was volunteered to prime and cap the beer and she did an admirable job, however she is complaining of a sore hand...

Labelling
In my first post I mentioned that using milk was the best way to attach paper labels. I set up my labelling workstation on the dining room table and found a small paintbrush. Whilst I wouldn't say I was skeptical I certainly wasn't filled with confidence that milk would provide the clean, simple and aesthetic adhesive solution I desired. Imagine my surprise when I discover that labelling the beer bottles was a piece of piss. Really. It was easy, and I had 40 bottles labelled in about 10 minutes.

The finished product looks pretty good, I think. The next part of the process is probably the hardest, as I need to allow the Cerveza to bottle condition for at least two weeks. The beer will taste at its best about 3-6 months from now, as it matures with age. Like all bottle conditioned beers there will be a small sediment that shouldn't be drunk either.

I'm quite proud of my first homebrew experience so far, but the desire to try it along with my usual impatience needs to be controlled. I know if I try it too early I will not be happy with the taste with good reason.

I've also decided that I will keep brewing beer at home, and I have ordered 3 further ingredient packs from Coopers, which should arrive next week. I have an Australian Pale Ale, a Canadian Blonde Ale and a Wheat Beer coming to me. I've come up with the following labels for these :)


Wednesday, 7 September 2011

Krausen for a Brewsin

I removed the Krausen Kollar yesterday. As you can see from the picture there is a fair bit of 'gunk' left around the rim. I'm not sure exactly what this is but at a guess I'd say it's either dead/inactive yeast or a byproduct of the fermentation process. Either way, it's now a part of our sewerage system in Burntisland so if you live near the Haugh Road, sorry about the smell.

You can see that the bubbles have subsided considerably. At their peak I had bubbles about 4cm(1½") above the surface of the beer but now we're down to just a few on the surface. The lid is back on now and it remains this way for at least 3 days, possibly more. At that point testing the Specific Gravity (SG) daily becomes necessary to check for Final Gravity (FG). This is simply the point when the SG becomes stable for 2 or more days, and it indicates that the fermentation process is finished.

I checked the SG today (Day 4) and it was down to 1.012. This is a little lower than I expected and either means the fermentation process has run its course early, or that Hermano Cerveca will be a little stronger than I first feared. Thinking about it now, my earlier fears about my lower Original Gravity (OG) might simply have been down to the quality of water we enjoy in Scotland.

The reason for the concern is that alcohol content is calculated  using the following formula:

OG - FG ÷ 7.46 + 0.5% (to allow for bottle fermentation)

You don't need to stress the maths, the simple rule is that the larger the gap between OG and FG means the greater the alcohol volume. To give some perspective, if my FG is at 1.000 then my ABV will be about 5%. If FG ends at 1.007 then we're looking at 4%. It might seem a little weird that I am stressing so much about the ABV. The truth is, I just want my label to look right!

Finally, I've tasted the 'beer'. It's, well... not great. But it's not finished! As my wife Jenny put it "it tastes like warm, flat, crap beer". Sounds Mexican to me...


Tuesday, 6 September 2011

It's alive!

Mmmmm, it smells like beer! tasty beer!

Bubbles formed on the surface about 16 hours after I mixed it all up. The bubble layer peaked at around 1" deep and has started over the last day to subside ever so slowly. I am to remove the 'Krausen Kollar' tomorrow, which is essentially there to ensure that the floating detritus from the bubbling process is left out of the final fermentation, as well as provide extra space should the bubbling be ferocious. That's about all I can do for now, although I intend to do a basic taste test tomorrow along with an unneccessary SG test just to satisfy my curiosity.

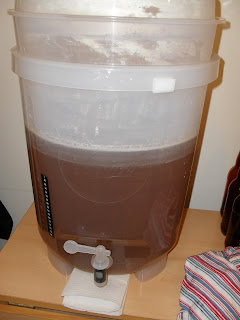
The other major development is a change of the colour. It started a dark brown, a little like the topping on a Creme Caramel. It has changed to a much more golden yellow 'Lagerish' colour which is great news as of course that's the colour it should be. I'll post some pictures of the removal of the collar tomorrow as well as an update on the SG level I take and maybe even some tasting notes.

Saturday, 3 September 2011

Wanna be startin' somethin'

Today I started Hermano properly. The kit came with a nifty DVD so I watched the first few chapters and even took notes before beginning. For those who haven't yet watched the video in my last update, here is a quick summary of what I've done today.
The entire kit
  1. Cleaned everything thoroughly
  2. Mixed the ingredients
  3. Added water for volume and to regulate temperature
  4. Added yeast
  5. Tested for the Original Gravity of the beer
The DVD recommended using hot water only in the first instance to clean & sanitise the equipment. This, coupled with our weekly daily showers promptly ensured we ran out of hot water halfway through the process.

Hot water and sugars
Mixing was reasonably straightforward as I used water just off the boil to ensure the sugars dissolved thoroughly. Once the main ingredients are added, the aim is to increase the volume from 2½ litres to 20-23 litres whilst regulating the temperature between 21°-27°C. My lack of hot water meant I had to use the kettle to do this. This led to a slight problem as the addition of near boiling water took the temperature from 23°C to 29°C at around 19L. I was able to get the temp down to 27°C right at 23L, but this might lead to a slightly lower alcohol content due to volume & dilution.

At this point I added the yeast and put the lid on. It stays like this for quite a while and I should start to see bubbles forming on the surface to indicate fermentation has begun. I need to keep the temperature consistent within that 21°-27°C range until I bottle the beer, which will be in around 10-15 days. I have decided to store in my kitchen to ensure the current weird weather we're getting doesn't have too much effect.

Before I could relax however, I needed to test the Original Gravity (OG) of the beer. This is important as it is used when calculating the ABV of the brew as well as a measure for successful fermentation. Testing is simple enough, done by drawing a small sample from the tap into the tube that comes with the kit. What can be a problem is if said tube doesn't have a firmly affixed base. With my first sample safely deposited on the Kitchen floor, I drew a second sample carefully and measured the OG. It came out at 1.033, with the instruction guide looking for 1.034-1.038. I suspect I'm at the lower end due to filling right to 23L. It's certainly not a show stopper I think, but it might mean Craig & I end up drinking beer that is weak and bad-tasting. It is meant to be Mexican though, so he might not notice...

The next step is to check we've started fermenting in 12-24 hours. After that I need to remove the collar on day 3 and check the Specific Gravity (SG) on day 6. Each of these tasks are quite small so I'll condense into one update in just under a week.

Fingers crossed!